Crafting the Perfect Student Registration Form in VB.Net 2023: A Step-by-Step Guide for Beginners

Student Registration Form in VB.Net
The student registration form is a critical component of any school management system as it allows administrators to efficiently register and enroll students into the school. Designing an effective student registration form is essential for ensuring accurate data collection, streamlined enrollment processes, and improved overall efficiency.
When designing the student registration form, it is important to consider the following aspects:
- User-friendly Interface
- Comprehensive Data Collection
- Data Validation and Verification
- Customization and Flexibility
By carefully designing the student registration form with these considerations in mind, schools can streamline the enrollment process, improve data accuracy, and enhance overall efficiency in managing student registrations.
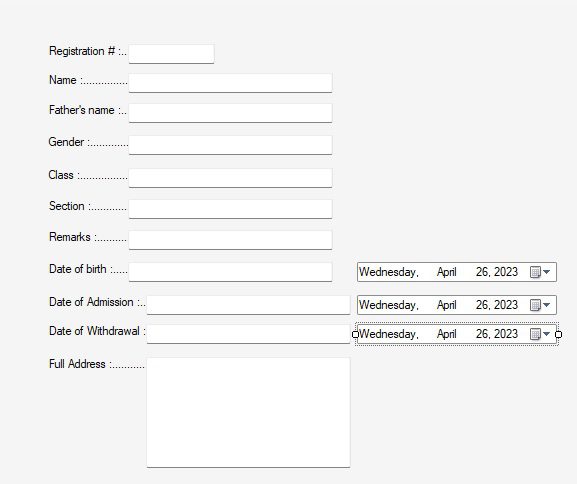
Okay! Now let’s start to design our Form1 that is the first child form of our MDIForm1. Drag and drop some labels and textboxes from tools menu onto Form1. Also drag and drop three DateTimePickers and make visible property of these datetimepickers to false. We will made them visible when needed at runtime. Design all the controls as shown in the image below:
Now let’s start some coding to bind and view fields of std_registration to the vb.net form.
Once you have created the “std_registration” table in the “modernschools” database, you can now proceed to bind and view the fields of the table in a VB.NET form. First of all, please add the following namespace directory to the top of Form1:
Imports System.Data.SqlClient
Now make a connection with the database and create some variables to get data from the table. Add the following code just after “Public Class Form1”
Public Class Form1
    Private connectionString As String = "Data Source=(local);Initial Catalog=modernschools;Integrated Security=True"
    Private bindingSource As BindingSource
    Private dataView As DataView
    Private DataTable As DataTable
    Private currencyManager As CurrencyManager
You can use data binding with BindingSource, DataView, and CurrencyManager to bind the data from the “std_registration” table to text boxes in VB.NET. Here’s an updated example code snippet that demonstrates how you can achieve this:
Private Sub LoadData()
        ' Step 1: Establish a connection to the modernschools database
        Using connection As SqlConnection = New SqlConnection(connectionString)
            Using command As SqlCommand = New SqlCommand("SELECT * FROM std_registration", connection)
                Try
                    connection.Open()

                    ' Step 2: Retrieve data from the std_registration table
                    Using adapter As SqlDataAdapter = New SqlDataAdapter(command)
                        Dim dataSet As DataSet = New DataSet()
                        adapter.Fill(dataSet, "std_registration")
                        DataTable = dataSet.Tables("std_registration")

                        ' Step 3: Bind the retrieved data to the text boxes
                        bindingSource = New BindingSource(dataSet, "std_registration")
                        dataView = New DataView(DataTable)
                        currencyManager = CType(BindingContext(bindingSource), CurrencyManager)

                        ' Bind text boxes to data fields
                        TextBox1.DataBindings.Add("Text", bindingSource, "id")
                        TextBox2.DataBindings.Add("Text", bindingSource, "name")
                        TextBox3.DataBindings.Add("Text", bindingSource, "father_name")
                        TextBox4.DataBindings.Add("Text", bindingSource, "gender")
                        TextBox5.DataBindings.Add("Text", bindingSource, "class")
                        TextBox6.DataBindings.Add("Text", bindingSource, "section")
                        TextBox7.DataBindings.Add("Text", bindingSource, "remarks")
                        TextBox8.DataBindings.Add("Text", bindingSource, "date_of_birth")
                        TextBox9.DataBindings.Add("Text", bindingSource, "date_of_admission")
                        TextBox10.DataBindings.Add("Text", bindingSource, "date_of_withdrawal")
                        TextBox11.DataBindings.Add("Text", bindingSource, "address")
                        connection.Close()
                    End Using
                Catch ex As Exception
                    MessageBox.Show("Error loading data: " & ex.Message)
                End Try
            End Using
        End Using
    End Sub
In this example, we’re using a BindingSource object to bind the data from the “std_registration” table to the form’s text boxes. We’re also using a DataView object to provide a filtered view of the data, and a CurrencyManager object to manage the current record position. The BindingSource object acts as an intermediary between the data source (the DataTable object) and the form’s controls (the text boxes).
Now call this function in the Form1 Load:
 Private Sub Form1_Load(sender As Object, e As EventArgs) Handles MyBase.Load
        ' Load the data from the std_registration table and bind it to the text boxes
        LoadData()
    End Sub
If you run your application at this time and click the “Students Registration” button at the Left side. The child Form should be loaded successfully without any error. Though, You will not see any data in the textboxes because we haven’t any record in this table yet.
Now we need to insert some records in our table but before inserting records, I suggest making two functions. One should be locktextboxes, it will prevent our users from accidental modifications and the second function will be unloacktextboxes, this give allow the users to do modifications as well as will give them visual effects that they are in modifications mode.
 Private Sub locktextboxes()
        TextBox2.BackColor = Color.White
        TextBox3.BackColor = Color.White
        TextBox4.BackColor = Color.White
        TextBox5.BackColor = Color.White
        TextBox6.BackColor = Color.White
        TextBox7.BackColor = Color.White
        TextBox8.BackColor = Color.White
        TextBox9.BackColor = Color.White
        TextBox10.BackColor = Color.White
        TextBox11.BackColor = Color.White
        TextBox1.ReadOnly = True
        TextBox2.ReadOnly = True
        TextBox3.ReadOnly = True
        TextBox4.ReadOnly = True
        TextBox5.ReadOnly = True
        TextBox6.ReadOnly = True
        TextBox7.ReadOnly = True
        TextBox8.ReadOnly = True
        TextBox9.ReadOnly = True
        TextBox10.ReadOnly = True
        TextBox11.ReadOnly = True
        ' we will make the following controls as they will not be needed after saving the modifications
        DateTimePicker1.Visible = False
        DateTimePicker2.Visible = False
        DateTimePicker3.Visible = False
    End Sub
    Private Sub unlocktextboxes()
        TextBox1.BackColor = Color.Red 'we will not change the primary key
        TextBox2.BackColor = Color.Yellow
        TextBox3.BackColor = Color.Yellow
        TextBox4.BackColor = Color.Yellow
        TextBox5.BackColor = Color.Yellow
        TextBox6.BackColor = Color.Yellow
        TextBox7.BackColor = Color.Yellow
        TextBox8.BackColor = Color.Yellow
        TextBox9.BackColor = Color.Yellow
        TextBox10.BackColor = Color.Yellow
        TextBox11.BackColor = Color.Yellow
        TextBox1.ReadOnly = True 'we will not change the primary key
        TextBox2.ReadOnly = False
        TextBox3.ReadOnly = False
        TextBox4.ReadOnly = False
        TextBox5.ReadOnly = False
        TextBox6.ReadOnly = False
        TextBox7.ReadOnly = False
        TextBox8.ReadOnly = False
        TextBox9.ReadOnly = False
        TextBox10.ReadOnly = False
        TextBox11.ReadOnly = False
        ' we will make the following controls, the users will select date from here
        DateTimePicker1.Visible = True
        DateTimePicker2.Visible = True
        DateTimePicker3.Visible = True
    End Sub
Call the locktextboxes function in the Form1_Load method:
 Private Sub Form1_Load(sender As Object, e As EventArgs) Handles MyBase.Load
        locktextboxes()
        ' Load the data from the std_registration table and bind it to the text boxes
        LoadData()
    End Sub
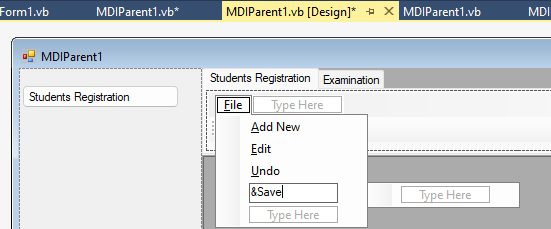
Now we will add a sub menu to the students registration Tab under the File menu as shown in the pigure below:
Go to the form1 code page and add a public function that will make all textboxes empty so our users feel easy to type data of the students.
Public Sub add_new()
        TextBox1.Text = ""
        TextBox2.Text = ""
        TextBox3.Text = ""
        TextBox4.Text = ""
        TextBox5.Text = ""
        TextBox6.Text = ""
        TextBox7.Text = ""
        TextBox8.Text = ""
        TextBox9.Text = ""
        TextBox10.Text = ""
        TextBox11.Text = ""
        unlocktextboxes()
        TextBox2.Focus()
    End Sub
Also open the Form1 in design mode and double click each datetimepicker and add the following code one by one.
 Private Sub DateTimePicker1_ValueChanged(sender As Object, e As EventArgs) Handles DateTimePicker1.ValueChanged
        TextBox8.Text = DateTimePicker1.Value
    End Sub

    Private Sub DateTimePicker2_ValueChanged(sender As Object, e As EventArgs) Handles DateTimePicker2.ValueChanged
        TextBox9.Text = DateTimePicker2.Value
    End Sub

    Private Sub DateTimePicker3_ValueChanged(sender As Object, e As EventArgs) Handles DateTimePicker3.ValueChanged
        TextBox10.Text = DateTimePicker3.Value
    End Sub
In the above code example , i have tried that when the user change date in any datetimepicker, it will come to our textboxes directly.
Now let’s create our most important function here in the form1 that will be responsible to insert the input of the user as a new record in our table.
 Public Sub save_add_new_data()
        ' Force the user to type the name of the students. it is just for example
        If TextBox2.Text = "" Then
            MessageBox.Show("You should type the name of the student.", "PANRUM", MessageBoxButtons.OK, MessageBoxIcon.Information)
            Exit Sub
        End If
        Try
            ' Create a new instance of SqlConnection with the connection string
            Using connection As New SqlConnection("Data Source=(local);Initial Catalog=modernschools;Integrated Security=True")
                ' Open the connection
                connection.Open()

                ' Create a SQL INSERT statement with parameters
                Dim sql As String = "INSERT INTO std_registration (name, father_name, gender, class, section,remarks, date_of_birth, date_of_admission, date_of_withdrawal,address) VALUES (@name, @fatherName, @gender,   @class, @section,@remarks, @dateOfBirth, @dateOfAdmission, @dateOfWithdrawal,@address)"

                ' Create a new instance of SqlCommand with the SQL statement and connection
                Using command As New SqlCommand(sql, connection)
                    ' Add parameters and set their values
                    command.Parameters.AddWithValue("@name", TextBox2.Text)
                    command.Parameters.AddWithValue("@fatherName", TextBox3.Text)
                    command.Parameters.AddWithValue("@gender", TextBox4.Text)
                    command.Parameters.AddWithValue("@class", TextBox5.Text)
                    command.Parameters.AddWithValue("@section", TextBox6.Text)
                    command.Parameters.AddWithValue("@remarks", TextBox7.Text)
                    command.Parameters.AddWithValue("@dateOfBirth", TextBox8.Text)
                    command.Parameters.AddWithValue("@dateOfAdmission", TextBox9.Text)
                    command.Parameters.AddWithValue("@dateOfWithdrawal", TextBox10.Text)
                    command.Parameters.AddWithValue("@address", TextBox11.Text)

                    ' Execute the SQL command
                    command.ExecuteNonQuery()

                    ' Close the connection
                    connection.Close()

                    ' Display a success message
                    MessageBox.Show("Student registration data inserted successfully.", "Success", MessageBoxButtons.OK, MessageBoxIcon.Information)
                    locktextboxes()

                End Using
            End Using
        Catch ex As Exception
            ' Display an error message if something goes wrong
            MessageBox.Show("Error inserting student registration data: " & ex.Message, "Error", MessageBoxButtons.OK, MessageBoxIcon.Error)
        End Try
    End Sub
Okay! Now open the MDIParent1 form and make a global variable addnew_edit that will control if the user has clicked the add new option or edit option from our menu bar.
Public Class MDIParent1
    Private m_ChildFormNumber As Integer
    Dim addnew_edit As Short = 0
Also go to the MDIParent1 Form Load method and call the “Students Registration” button click. So that when the user launches our application, the child form1 is loaded automatically. Your MDIParent1_Load should look like this
 Private Sub MDIParent1_Load(sender As Object, e As EventArgs) Handles Me.Load
        GenerateDatabase()
        CreateTable()
        Button1_Click(Nothing, Nothing)
    End Sub
Now open this MDIParent1 Form in the design view and double click the Add New sub menu and code it as below:
Private Sub AddNewToolStripMenuItem_Click(sender As Object, e As EventArgs) Handles AddNewToolStripMenuItem.Click
        Try
            addnew_edit = 1 ' it means that the user has clicked the add new
            Dim newmdichild As New Form1
            newmdichild = CType(ActiveMdiChild, Form1)
            newmdichild.add_new()
        Catch ex As Exception
            MessageBox.Show(ex.Message)
        End Try
    End Sub
Now go back to the design view of this form again and double click the “Save” sub menu under the File and code it as:
 Try
            Dim newmdichild As New Form1
            newmdichild = CType(ActiveMdiChild, Form1)
            If addnew_edit = 1 Then
                newmdichild.save_add_new_data()
            ElseIf addnew_edit = 2 Then
                ' we will add this function later in the next part of this chapter when we navigate and search records
                ' newmdichild.save_edit_data()

            End If
        Catch ex As Exception
            MessageBox.Show(ex.Message)
        End Try
That’s all we have completed our lesson successfully. Now run the application, click the Add New menu. Type a students data and save it to click the Save option from the menu. Insert some records by Add New and save. Now go to the MSSQL Server, right click on the “std_registeration” table and click the “select Top 1000 rows” from the pop up menu and you will see that all the records are inserted in the table row by row as in my case you can see below in the image:

In the the next and last part of this chapter we will make navigation of records. we will also make our application be able to search records and at last we will make our user be able to modify any existing records.
Conclusion
In the realm of educational software development, the creation of a Student Registration Form using VB.NET stands as a fundamental and impactful endeavor. Throughout this exploration of designing and implementing a Student Registration Form, we’ve delved into various aspects that contribute to an efficient and user-friendly registration process for students.
The process of Student Registration is not merely a data collection exercise; it represents a crucial interaction point between students and educational institutions. From capturing essential personal details to allowing course selection and academic information input, the Student Registration Form streamlines the enrollment process and sets the tone for a student’s academic journey.
VB.NET’s capabilities play a pivotal role in crafting a dynamic and responsive registration form. The utilization of GUI components, event handling, validation techniques, and database integration collectively contribute to creating a seamless experience for both students and administrators.
Furthermore, a well-designed Student Registration Form prioritizes data accuracy and security. Implementing measures such as input validation, encryption of sensitive information, and error handling not only ensure a smooth registration process but also protect students’ data privacy.
As educational institutions strive for excellence in student services, the importance of a user-centric approach cannot be overstated. By considering usability principles, incorporating intuitive design, and providing clear instructions, developers enhance the accessibility and user-friendliness of the Student Registration Form.
In a world where technology evolves rapidly, embracing emerging trends such as mobile responsiveness and cloud-based storage can elevate the Student Registration experience further. By staying attuned to students’ needs and leveraging VB.NET’s versatility, developers can create registration forms that reflect the institution’s commitment to innovation, efficiency, and a positive student journey.
Q: 1. What is a “Student Registration Form” in VB.NET?
A: A Student Registration Form in VB.NET is a graphical interface that allows students to provide personal, academic, and contact information for enrollment purposes.
Q: 2. Why is a well-designed “Student Registration Form” important?
A: A well-designed Student Registration Form enhances user experience, ensures accurate data collection, and sets a positive impression of the institution.
Q: 3. What role does validation play in a “Student Registration Form”?
A: Validation ensures that data entered into the form is accurate and conforms to specified formats, preventing errors and enhancing data integrity.
Q: 4. How does database integration benefit a “Student Registration Form”?
A: Integrating a database allows the captured student information to be securely stored, easily accessible, and retrievable for administrative purposes.
Q: 5. Can a “Student Registration Form” accommodate course selection?
A: Yes, a comprehensive Student Registration Form can include options for students to select their desired courses, facilitating enrollment in specific programs.
Q: 6. What are the benefits of error handling in a “Student Registration Form”?
A: Error handling prevents application crashes due to unexpected inputs, guiding users to correct any mistakes while providing a smooth registration process.
Q: 7. How can a “Student Registration Form” ensure data security?
A: Data security can be ensured through encryption of sensitive information, limiting access to authorized personnel, and complying with data protection regulations.
Q: 8. Is mobile responsiveness important for a “Student Registration Form”?
A: Yes, making the Student Registration Form mobile-responsive ensures that students can easily complete the registration process using various devices, enhancing accessibility.
Q: 9. Can a “Student Registration Form” be integrated with other systems?
A: Absolutely, integration with other systems like student information systems or payment gateways can streamline the overall enrollment process.
Q: 10. How can user feedback improve a “Student Registration Form”?
A: Gathering feedback from students using the form can identify pain points, usability issues, and areas for improvement, leading to an enhanced registration experience.
More Links
