Mastering Your Exam Timetable: The Best 1 Practical Tips for Academic Success in Vb.Net

How to create Exam Timetable?
In this chapter, we will handle exam timetable for all our classes. First of we will create a new form for this purpose. Therefore, Right click on the project in your solution explorer and choose Add new item from the popup menu, then choose windows form and click the Add button. Our new Form2 will be created, resize it as per your requirements. Now drag and drop a ComboBox from the tools menu onto the Form2. Make the Control Box of the Form2 to False in the property windows. Also make the FormBorderStyle to None.
Let’s create simple function that will populate this Combobox from all our classes so that when the user select a class, we will be able to insert or update the timetable of that class. In that case, we can directly populate the combobox with the provided list of classes like 1st, 2nd, 3rd, 4th, 5th, 6th, 7th, 8th, 9th, and 10th. Here is an example code in VB.NET:
 Private Sub PopulateClassComboBox()
        ComboBox1.Items.Clear()
        ComboBox1.Items.Add("1st")
        ComboBox1.Items.Add("2nd")
        ComboBox1.Items.Add("3rd")
        ComboBox1.Items.Add("4th")
        ComboBox1.Items.Add("5th")
        ComboBox1.Items.Add("6th")
        ComboBox1.Items.Add("7th")
        ComboBox1.Items.Add("8th")
        ComboBox1.Items.Add("9th")
        ComboBox1.Items.Add("10th")
    End Sub
In this code, we first clear any existing items in the combobox and then add the classes one by one to the combobox. We can call this function in the form load event to populate the combobox when the form2 is loaded.
Private Sub Form2_Load(sender As Object, e As EventArgs) Handles MyBase.Load
        PopulateClassComboBox()
    End Sub
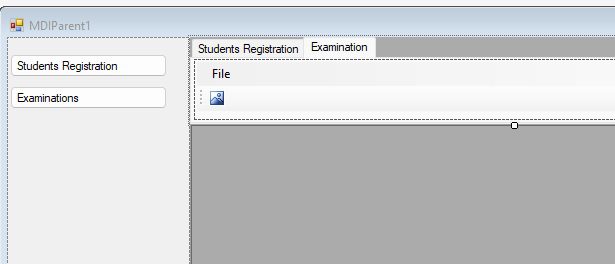
Now Double click the MDIParent1 Form to open it in the design view and add a new Button next to that of “Students Registration”. Change the text of this new Button to ‘Examinations’. Click to bring to front the TabControl2 and add a MenuStrip and Toolstrip from the toolbox menu so that your MDIParent1 Form looks like as:
Now double click the examinations button that is our Button2 to open its code window and code it as:
 Private Sub Button2_Click(sender As Object, e As EventArgs) Handles Button2.Click
        Me.TabControl1.SelectedTab = Me.TabPage2
        For Each ChildForm As Form In Me.MdiChildren
            ChildForm.Close()
        Next
        ' Create and show the studentexaminationForm as a child form
        Dim studentexaminationForm As New Form2()
        studentexaminationForm.MdiParent = Me
        studentexaminationForm.Dock = DockStyle.Fill

        studentexaminationForm.Show()
    End Sub
Create New Table
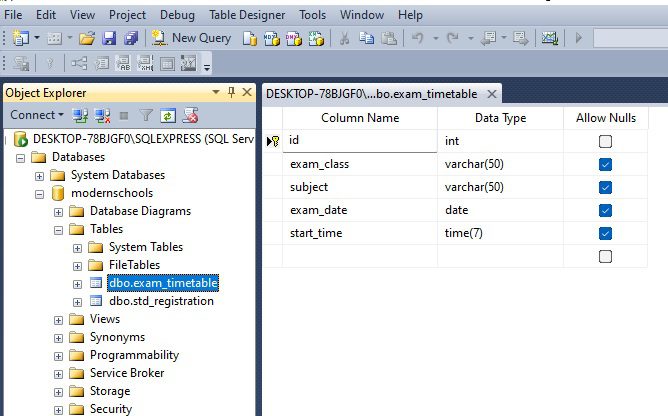
Let’s create a new table named it exam_timetable im our ‘modernschools’ database programatically. The fields we need here are id as primary key, exam_class,subject, date and starting time
Here’s an example code in VB.NET to create a new table named exam_timetable in our modernschools database with the required fields in the MDIParent1 Form:
scss
Private Sub create_exam_timetable()
       Try
            Dim connectionString As String = "Data Source=(local);Initial Catalog=modernschools;Integrated Security=True"
            Using connection As SqlConnection = New SqlConnection(connectionString)
                Dim command As SqlCommand = New SqlCommand()
                command.Connection = connection
                connection.Open()

                ' Create exam_timetable table
                command.CommandText = "CREATE TABLE exam_timetable (id INT PRIMARY KEY IDENTITY(1,1), exam_class VARCHAR(50), subject VARCHAR(50), exam_date DATE, start_time TIME)"
                command.ExecuteNonQuery()
            End Using
        Catch ex As Exception

        End Try
    End Sub
In this code, we first establish a connection to our SQL Server database using the provided connection string. Then, we create a new SqlCommand object and set its connection property to our SqlConnection object.
Next, we open the connection and execute a SQL command to create a new table named exam_timetable with four columns: id (an integer primary key with auto-increment), exam_class (a varchar column for storing the class name), subject (a varchar column for storing the subject name), exam_date (a date column for storing the exam date), and start_time (a time column for storing the starting time of the exam).
Once the command is executed successfully, the connection is closed automatically due to the Using statement.
Call the above function in the MDIParen1 Form Load event, so that the over all code of the Form Load look like as:
 Private Sub MDIParent1_Load(sender As Object, e As EventArgs) Handles Me.Load
        GenerateDatabase()
        CreateTable()
        Button1_Click(Nothing, Nothing)
        create_exam_timetable()
    End Sub
Run the application only to load the MDIParent1 Form so that our new code executes to create ‘exam_timetable’. Now open MSQSQL Management Studio, expand databases, expand tables and right click “exam_timetable’. A popup menu will appear , click the design to see that all the required fields have been created successfylly as shown in the figure below:
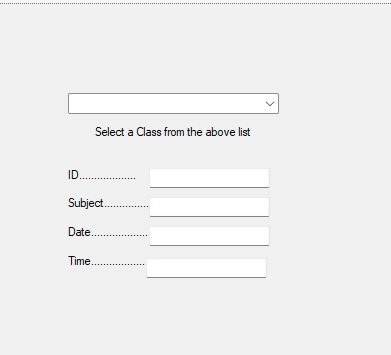
Now let’s do some coding in our Form2. First drag and drop three labels and three textboxes on to the Form2, so that your Form looks like as:
Now open this Form2 in the code view and at the top add the following code before Public Class Form2:
Imports System.Data.SqlClient
Add the following function before the end class in the code view of Form2.
 Private Sub BindExamTimetable(exam_class As String)
        Dim connectionString As String = "Data Source=(local);Initial Catalog=modernschools;Integrated Security=True"
        Dim connection As SqlConnection = New SqlConnection(connectionString)
        connection.Open()
        Dim command As SqlCommand = New SqlCommand("SELECT * FROM exam_timetable", connection)
        ' Check if there is an existing row for the selected class
        Dim query As String = "SELECT * FROM exam_timetable WHERE exam_class='" & exam_class & "'"
        Dim cmd As New SqlCommand(query, connection)
        Dim adapter As New SqlDataAdapter(cmd)
        Dim dt As New DataTable()
        adapter.Fill(dt)

        If dt.Rows.Count = 0 Then
            ' If there is no existing row, insert a new blank row for the selected class
            query = "INSERT INTO exam_timetable (exam_class) VALUES ('" & exam_class & "')"
            cmd = New SqlCommand(query, connection)
            cmd.ExecuteNonQuery()

            ' Re-query the table to get the newly inserted row
            adapter = New SqlDataAdapter("SELECT * FROM exam_timetable WHERE exam_class='" & exam_class & "'", connection)
            dt = New DataTable()
            adapter.Fill(dt)
        End If

        ' Bind the exam timetable fields in their respective textboxes
        TextBox1.Text = dt.Rows(0)("id").ToString()
        TextBox2.Text = dt.Rows(0)("subject").ToString()
        TextBox3.Text = dt.Rows(0)("exam_date").ToString()
        TextBox4.Text = dt.Rows(0)("start_time").ToString()
    End Sub
This function takes the selected class as an argument, and first checks if there is an existing row for that class in the exam_timetable table. If there is no row, it inserts a new blank row for that class and re-queries the table to get the newly inserted row. If there is already an existing row, it simply queries that row and binds the exam timetable fields in their respective textboxes.
You can call this function from the ComboBox.SelectedIndexChanged event handler, like this:
Private Sub ComboBox1_SelectedIndexChanged(sender As Object, e As EventArgs) Handles ComboBox1.SelectedIndexChanged
        Dim selectedClass As String = ComboBox1.SelectedItem.ToString()
        BindExamTimetable(selectedClass)
    End Sub
Now we will create two functions like we had created in the Form1 so to give our user a visual effect. You are already familiar with these functions as they are discussed in the previous chapter 3.
  Public Sub locktextboxes()
        TextBox1.BackColor = Color.White
        TextBox2.BackColor = Color.White
        TextBox3.BackColor = Color.White
        TextBox4.BackColor = Color.White
        TextBox1.ReadOnly = True
        TextBox2.ReadOnly = True
        TextBox3.ReadOnly = True
        TextBox4.ReadOnly = True
    End Sub
    Public Sub unlocktextboxes()
        TextBox1.BackColor = Color.Red
        TextBox2.BackColor = Color.Yellow
        TextBox3.BackColor = Color.Yellow
        TextBox4.BackColor = Color.Yellow
        TextBox1.ReadOnly = True
        TextBox2.ReadOnly = False
        TextBox3.ReadOnly = False
        TextBox4.ReadOnly = False

    End Sub
Let’s craete a function that will be called when the user type some inputs in the textboxes and wishes to save these modifications.
Public Sub update_record()
        Dim connectionString As String = "Data Source=(local);Initial Catalog=modernschools;Integrated Security=True"
        Using connection As SqlConnection = New SqlConnection(connectionString)
            connection.Open()
            Dim id As Integer = Val(TextBox1.Text)
            Dim query As String = "UPDATE std_registration SET subject = @subject, exam_date = @exam_date, start_time = @start_time WHERE id = @id"
            Dim command As SqlCommand = New SqlCommand(query, connection)
            command.Parameters.AddWithValue("@id", id)
            command.Parameters.AddWithValue("@subject", TextBox2.Text)
            command.Parameters.AddWithValue("@exam_date", TextBox3.Text)
            command.Parameters.AddWithValue("@start_time", TextBox4.Text)

            If connection.State = ConnectionState.Closed Then
                connection.Open()
            End If

            Dim rowsAffected As Integer = command.ExecuteNonQuery()
            If rowsAffected > 0 Then
                MessageBox.Show("Record updated successfully.")

            Else
                MessageBox.Show("No record found with the specified ID.")
            End If
        End Using
        locktextboxes()
    End Sub
Let’s create another function that if a user change his/her mind to not save the changes and wishes to undo his input:
Public Sub undo_changes()

        Dim connectionString As String = "Data Source=(local);Initial Catalog=modernschools;Integrated Security=True"
        Dim connection As SqlConnection = New SqlConnection(connectionString)
        Dim adapter As SqlDataAdapter = New SqlDataAdapter("SELECT * FROM exam_timetable where id=" & Val(TextBox1.Text), connection)
        Dim dataSet As DataSet = New DataSet()
        adapter.Fill(dataSet, "exam_timetable")
        Dim dataTable As DataTable = dataSet.Tables("exam_timetable")
        ' Open the connection
        connection.Open()


        Dim currencyManager As CurrencyManager = CType(BindingContext(dataTable), CurrencyManager)

        If dataTable.Rows.Count > 0 Then
            Dim originalRow As DataRow = dataTable.Rows(currencyManager.Position)
            Dim currentRow As DataRowView = CType(currencyManager.Current, DataRowView)
            currentRow.Row.ItemArray = originalRow.ItemArray
            MessageBox.Show("Original data has been restored.")
        Else
            MessageBox.Show("No record to restore.")
        End If
        BindExamTimetable(ComboBox1.Text)
        locktextboxes()
    End Sub
This function undo_changes() retrieves the data of a single row from the exam_timetable table in the modernschools database using the id value entered in TextBox1. It then uses this data to restore the original values of the row in case any changes were made to it, and the user wishes to undo those changes.
To do this, it first creates a connection to the database using the connection string “Data Source=(local);Initial Catalog=modernschools;Integrated Security=True”. It then creates a SqlDataAdapter object to retrieve the data of the row from the database using a SELECT query that filters on the id value entered in TextBox1. It then fills a DataSet object with the retrieved data and creates a DataTable object with the exam_timetable table data from the DataSet.
After that, it creates a CurrencyManager object using the dataTable, which provides currency-style navigation and editing functionality for the data in the DataTable. It then checks if the dataTable contains any rows and retrieves the original values of the current row using the Position property of the CurrencyManager. It then restores the original values of the current row using the ItemArray property of both the current and original rows.
Finally, it displays a message box to inform the user that the original data has been restored, and calls the BindExamTimetable() function to refresh the data in the DataGridView based on the selected class in ComboBox1. It also calls the locktextboxes() function to lock the text boxes again.
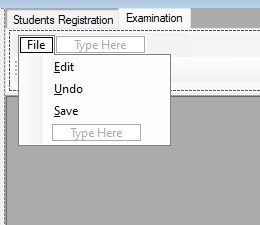
Now let’s go back to MDIParent1 Form and complete the File menu like the one shown below:
Double click the Edit menu strip to open its code window and code it as:
  Private Sub EditToolStripMenuItem1_Click(sender As Object, e As EventArgs) Handles EditToolStripMenuItem1.Click
        Try
            Dim newmdichild As New Form2
            newmdichild = CType(ActiveMdiChild, Form2)
            newmdichild.unlocktextboxes()
        Catch ex As Exception
            MessageBox.Show(ex.Message)
        End Try
    End Sub
Go back to the design view and double click the undo menu strip and code it as below:
Private Sub UndoToolStripMenuItem1_Click(sender As Object, e As EventArgs) Handles UndoToolStripMenuItem1.Click
        Try
            Dim newmdichild As New Form2
            newmdichild = CType(ActiveMdiChild, Form2)
            newmdichild.undo_changes()

        Catch ex As Exception
            MessageBox.Show(ex.Message)
        End Try
    End Sub
Again open the MDIParent1 form in the design view and double click the save menu strip and code it as below:
 Private Sub SaveToolStripMenuItem1_Click(sender As Object, e As EventArgs) Handles SaveToolStripMenuItem1.Click
        Try
            Dim newmdichild As New Form2
            newmdichild = CType(ActiveMdiChild, Form2)
            newmdichild.update_record()
        Catch ex As Exception
            MessageBox.Show(ex.Message)
        End Try
    End Sub
That’s all, we completed our this Part of chapter 4. Now run the application. Click the ‘Examinations’ button. Select a class and click edit and type subject like 10th, type Date in the formate like 12/12/2022 and type starting time in the formate like 8:00 and click the save button.
Conclusion:
In conclusion, the development and implementation of the exam timetable application in VB.NET and MSSQL offer a comprehensive and efficient solution for managing examination schedules in academic institutions. The application’s seamless integration of VB.NET and MSSQL provides a robust and user-friendly platform that simplifies the process of creating, managing, and updating exam timetables.
One of the primary strengths of the application lies in its ability to handle complex scheduling scenarios effectively. With support for multiple exams in a day, overlapping time slots, and venue constraints, the application ensures that scheduling conflicts are minimized, promoting a smooth and well-organized examination process.
The user-friendly interface of the application allows administrators to easily input exam details, allocate venues, and assign custom colors to events, enabling quick and hassle-free timetable creation. The drag and drop feature for event moving and resizing further enhances the application’s usability, providing flexibility and convenience in managing the timetable.
The use of MSSQL as the backend database ensures the secure storage and retrieval of exam-related data, guaranteeing data integrity and security. The application’s scalability makes it suitable for academic institutions of different sizes, accommodating a large number of exams and students.
By streamlining the entire exam scheduling process, the exam timetable application reduces manual efforts, minimizes errors, and saves valuable time for administrators and faculty. It improves efficiency and accuracy in managing exam schedules, leading to a more effective and organized academic environment.
Overall, the exam timetable application in VB.NET and MSSQL stands as a valuable tool for academic institutions, empowering them to create and manage exam timetables with ease, precision, and efficiency. Its features, seamless integration, and user-friendly interface contribute to a more seamless examination process, benefiting both administrators and students alike.
Q: 1. What is the exam timetable application?
A: The exam timetable application is a software tool developed using VB.NET and MSSQL to help academic institutions efficiently schedule and manage exam timings, venues, and related details.
Q: 2. How does the exam timetable application handle complex scheduling scenarios?
A: The application is designed to handle multiple exams in a day, overlapping time slots, and venue constraints, ensuring a well-organized and conflict-free exam timetable.
Q: 3. Can I allocate specific venues for each exam using the application of exam timetable?
A: Yes, the exam timetable application allows you to assign specific venues and rooms for each exam, making it easier to manage exam logistics.
Q: 4. How does the application prevent clashes or exam timetable conflicts between exams?
A: The application includes smart algorithms to detect and avoid clashes between exams, ensuring a smooth and error-free exam timetable.
Q: 5. Can I make changes to the exam timetable after it has been created?
A: Yes, the application offers flexibility for administrators to update and modify the exam timetable as needed.
Q: 6. Is the exam timetable data stored securely in the MSSQL database?
A: Absolutely, the application ensures data integrity and security, with exam-related information stored safely in the MSSQL database for exam timetable.
Q: 7. Does the exam timetable application have a user-friendly interface?
A: Yes, the application features an intuitive and user-friendly interface for easy data input and management of exam details in each exam timetable.
Q: 8. Can the application generate printable reports or export the exam timetable for distribution?
A: Yes, the application provides options to generate printable reports or export the exam timetable in various formats for distribution among students and faculty.
Q: 9. Can I set up reminders or notifications for exam supervisors or students about exam timetable using the application?
A: Yes, the application can be configured to send reminders or notifications to exam supervisors and students regarding their exam timetable.
Q: 10. Is the exam timetable application scalable to handle a large number of exams and students?
A: Absolutely, the application for exam timetable is designed to be scalable, making it suitable for academic institutions of all sizes, from small schools to large universities.
More Links

