How to Create Graphics in VB.NET: A Comprehensive Guide for Beginners (VS – 2023)
Create Graphics in VB.NET
If you’re a beginner in VB.NET programming and want to learn how to create graphics, you’ve come to the right place. In this guide, we’ll walk you through everything you need to know to get started with graphics in VB.NET. We’ll cover the basics of creating graphics, drawing shapes, adding colors and gradients, and even animating your graphics. So, let’s get started!
Introduction
Graphics programming is an essential skill for any programmer who wants to create visually appealing applications. With VB.NET, you have access to a powerful set of tools for creating graphics, including drawing shapes, adding colors and gradients, and animating your graphics. In this guide, we’ll show you how to get started with graphics programming in VB.NET.
Creating a Graphics Object
The first step in creating graphics in VB.NET is to create a Graphics object. This object is used to draw shapes and other elements onto your form or control. You can create a Graphics object by calling the CreateGraphics method of your form or control, like this:
Dim g As Graphics = Me.CreateGraphics()
Once you have a Graphics object, you can start drawing shapes onto your form or control.
Drawing Shapes
One of the most basic tasks in graphics programming is drawing shapes. With VB.NET, you have access to a wide variety of shapes you can draw onto your form or control. Let’s take a look at how to draw some of the most common shapes.
Drawing Lines
Drawing a line is one of the simplest tasks in graphics programming. To draw a line, you can use the DrawLine method of your Graphics object.
Here are a few examples of how to draw lines in VB.NET:
1: Draw a simple line:
Public Class Form1
    Dim g As Graphics = Me.CreateGraphics()
    Private Sub Button1_Click(sender As Object, e As EventArgs) Handles Button1.Click
        g.DrawLine(Pens.Black, 20, 20, 200, 200)

    End Sub
End Class
The output will look like:
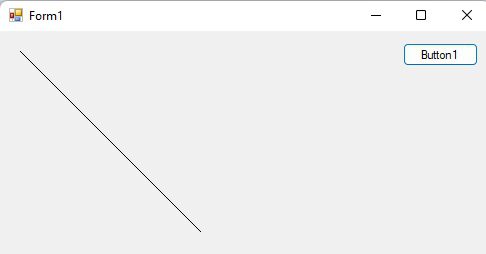
This code will draw a black line from the point (20,20) to the point (200,200).
2: Draw a line with a specific width:
Public Class Form1
    Dim g As Graphics = Me.CreateGraphics()
    Private Sub Button1_Click(sender As Object, e As EventArgs) Handles Button1.Click
        Dim pen As New Pen(Color.Black, 5)
        g.DrawLine(pen, 20, 20, 200, 200)

    End Sub
End Class
The output will look like:
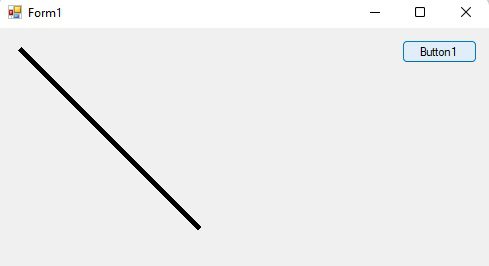
This code will draw a black line with a width of 5 pixels from the point (20,20) to the point (200,200).
3: Draw a dashed line:
Imports System.Drawing.Drawing2D
Public Class Form1
Dim g As Graphics = Me.CreateGraphics()
Private Sub Button1_Click(sender As Object, e As EventArgs) Handles Button1.Click
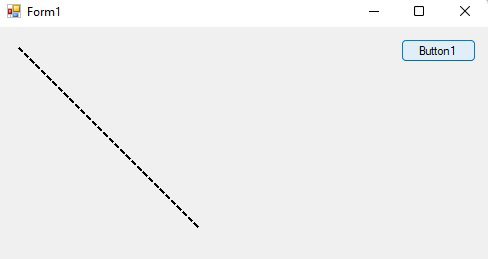
Dim pen As New Pen(Color.Black, 2)
pen.DashStyle = DashStyle.Dash
g.DrawLine(pen, 20, 20, 200, 200)
End Sub
End Class
This code will draw a dashed black line with a width of 2 pixels from the point (20,20) to the point (200,200).
Check the output:
4: Draw a line with a gradient:
Imports System.Drawing.Drawing2D

Public Class Form1
    Dim g As Graphics = Me.CreateGraphics()
    Private Sub Button1_Click(sender As Object, e As EventArgs) Handles Button1.Click
        Dim brush As New LinearGradientBrush(New Point(20, 20), New Point(200, 200), Color.Red, Color.Blue)
        Dim pen As New Pen(brush, 8)
        g.DrawLine(pen, 20, 20, 200, 200)

    End Sub
End Class
This code will draw a line with a gradient that goes from red to blue, with a width of 8 pixels, from the point point (20,20) to the point (200,200).
Check the output:

5: Draw a line with a custom dash pattern:
Imports System.Drawing.Drawing2D
Public Class Form1
Dim g As Graphics = Me.CreateGraphics()
Private Sub Button1_Click(sender As Object, e As EventArgs) Handles Button1.Click
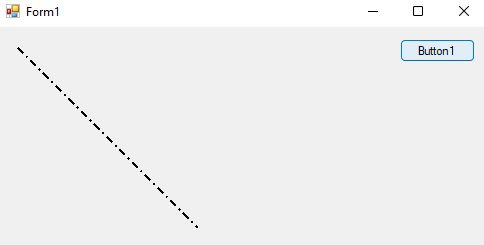
Dim pen As New Pen(Color.Black, 2)
pen.DashPattern = {4, 2, 1, 2}
g.DrawLine(pen, 20, 20, 200, 200)
End Sub
End Class
This code will draw a black line with a width of 2 pixels from the point (20,20) to the point (200,200), with a custom dash pattern that alternates between 4 pixels on, 2 pixels off, 1 pixel on, and 2 pixels off.
Check the output:
Drawing Rectangles
Drawing a rectangle is another common task in graphics programming. To draw a rectangle, you can use the DrawRectangle method of your Graphics object
Public Class Form1
Dim g As Graphics = Me.CreateGraphics()
Private Sub Button1_Click(sender As Object, e As EventArgs) Handles Button1.Click
' Create a brush with the desired fill color
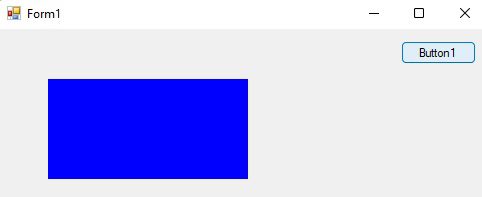
Dim brush As New SolidBrush(Color.FromArgb(255, 0, 0, 255))
' Create a rectangle to draw
Dim rect As New Rectangle(50, 50, 200, 100)
' Get the Graphics object of the form
Dim g As Graphics = Me.CreateGraphics()
' Draw the rectangle with the fill color
g.FillRectangle(brush, rect)
' Dispose of the brush and Graphics objects
brush.Dispose()
g.Dispose()
End Sub
End Class
In this code, we have created a Button control with the name Button1. When the user clicks on this button, the Button1_Click event handler is called.
This event handler creates a brush with the desired fill color, creates a rectangle to draw, and gets the Graphics object of the form using the CreateGraphics() method. Finally, the rectangle is drawn using the FillRectangle method of the Graphics object.
After the rectangle is drawn, we dispose of the brush and Graphics objects to free up system resources.
The output is given below.
Drawing Ellipses
Drawing an ellipse is similar to drawing a rectangle. To draw an ellipse, you can use the DrawEllipse method of your Graphics object.
Public Class Form1
    Dim g As Graphics = Me.CreateGraphics()
    Private Sub Button1_Click(sender As Object, e As EventArgs) Handles Button1.Click
        ' Create a brush with the desired fill color
        Dim brush As New SolidBrush(Color.FromArgb(255, 255, 0, 0))

        ' Create a rectangle to draw the ellipse in
        Dim rect As New Rectangle(50, 50, 200, 100)

        ' Get the Graphics object of the form
        Dim g As Graphics = Me.CreateGraphics()

        ' Draw the ellipse with the fill color
        g.FillEllipse(brush, rect)

        ' Dispose of the brush and Graphics objects
        brush.Dispose()
        g.Dispose()

    End Sub
End Class
In this code, we have created a Button control with the name Button1. When the user clicks on this button, the Button1_Click event handler is called.
This event handler creates a brush with the desired fill color, creates a rectangle to draw the ellipse in, and gets the Graphics object of the form using the CreateGraphics() method. Finally, the ellipse is drawn using the FillEllipse method of the Graphics object.
After the ellipse is drawn, we dispose of the brush and Graphics objects to free up system resources.
The output will look like:

Drawing Arcs
Drawing an arc is a little more complicated than drawing a line or a shape. To draw an arc, you can use the DrawArc method of your Graphics object.
Public Class Form1
Dim g As Graphics = Me.CreateGraphics()
Private Sub Button1_Click(sender As Object, e As EventArgs) Handles Button1.Click
' Create a brush with the desired fill color
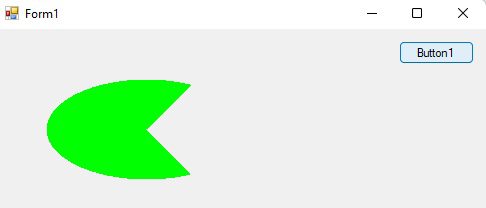
Dim brush As New SolidBrush(Color.FromArgb(255, 0, 255, 0))
' Create a rectangle to define the bounds of the arc
Dim rect As New Rectangle(50, 50, 200, 100)
' Define the start and sweep angles for the arc
Dim startAngle As Single = 45
Dim sweepAngle As Single = 270
' Get the Graphics object of the form
Dim g As Graphics = Me.CreateGraphics()
' Draw the arc with the fill color
g.FillPie(brush, rect, startAngle, sweepAngle)
' Dispose of the brush and Graphics objects
brush.Dispose()
g.Dispose()
End Sub
End Class
In this code, we have created a Button control with the name Button1. When the user clicks on this button, the Button1_Click event handler is called.
This event handler creates a brush with the desired fill color, creates a rectangle to define the bounds of the arc, and defines the start and sweep angles for the arc. Finally, the arc is drawn using the FillPie method of the Graphics object.
After the arc is drawn, we dispose of the brush and Graphics objects to free up system resources.
The output is given below.
Drawing Polygons
Drawing a polygon is a little more complex than drawing a line or a shape. To draw a polygon, you need to define a set of points that make up the vertices of the polygon, and then use the DrawPolygon method of your Graphics object.
Public Class Form1
    Dim g As Graphics = Me.CreateGraphics()
    Private Sub Button1_Click(sender As Object, e As EventArgs) Handles Button1.Click
        ' Create a brush with the desired fill color
        Dim brush As New SolidBrush(Color.FromArgb(255, 255, 0, 0))

        ' Define the points that make up the polygon
        Dim points As Point() = {New Point(50, 50), New Point(100, 25), New Point(200, 5),
                             New Point(250, 50), New Point(300, 150), New Point(200, 200)}

        ' Get the Graphics object of the form
        Dim g As Graphics = Me.CreateGraphics()

        ' Draw the polygon with the fill color
        g.FillPolygon(brush, points)

        ' Dispose of the brush and Graphics objects
        brush.Dispose()
        g.Dispose()
    End Sub
End Class
In this code, we have created a Button control with the name Button1. When the user clicks on this button, the Button1_Click event handler is called.
This event handler creates a brush with the desired fill color and defines the points that make up the polygon. Then, the polygon is drawn using the FillPolygon method of the Graphics object.
After the polygon is drawn, we dispose of the brush and Graphics objects to free up system resources.
The output is shown below.

Drawing Curves
Drawing a curve is a more complex task that involves defining a set of control points that determine the shape of the curve. To draw a curve, you can use the DrawCurve method of your Graphics object.
Public Class Form1
Dim g As Graphics = Me.CreateGraphics()
Private Sub Button1_Click(sender As Object, e As EventArgs) Handles Button1.Click
' Create a brush with the desired fill color
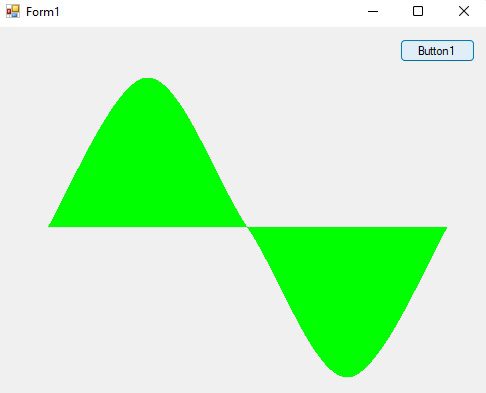
Dim brush As New SolidBrush(Color.FromArgb(255, 0, 255, 0))
' Define the points that make up the curve
Dim points As Point() = {New Point(50, 200), New Point(150, 50), New Point(250, 200),
New Point(350, 350), New Point(450, 200)}
' Create a GraphicsPath object and add the curve to it
Dim path As New GraphicsPath()
path.AddCurve(points)
' Get the Graphics object of the form
Dim g As Graphics = Me.CreateGraphics()
' Draw the curve with the fill color
g.FillPath(brush, path)
' Dispose of the brush, Graphics, and GraphicsPath objects
brush.Dispose()
g.Dispose()
path.Dispose()
End Sub
End Class
In this code, we have created a Button control with the name Button1. When the user clicks on this button, the Button1_Click event handler is called.
This event handler creates a brush with the desired fill color and defines the points that make up the curve. Then, it creates a GraphicsPath object and adds the curve to it using the AddCurve method.
After the GraphicsPath object is created, the curve is drawn using the FillPath method of the Graphics object.
Finally, we dispose of the brush, Graphics, and GraphicsPath objects to free up system resources.
The output is as.
Adding Colors and Gradients
Once you’ve mastered the basics of drawing shapes in VB.NET, you may want to add some color to your graphics. VB.NET provides several ways to add color to your graphics, including using the Color class, the Brush class, and the LinearGradientBrush class.
Using the Color Class
The Color class in VB.NET provides a way to specify a color using its RGB values. To use the Color class, you can create a new instance of the class and specify the RGB values, like this:
Dim red As Color = Color.FromArgb(255, 0, 0)
This code will create a new color object that represents the color red.
Using the Brush Class
The Brush class in VB.NET provides a way to fill shapes with a solid color. To use the Brush class, you can create a new instance of the class and specify the color you want to use, like this:
Dim brush As New SolidBrush(Color.Red)
g.FillRectangle(brush, 10, 10, 100, 50)
This code will fill a rectangle with the color red.
Using the LinearGradientBrush Class
The LinearGradientBrush class in VB.NET provides a way to fill shapes with a gradient color. To use the LinearGradientBrush class, you can create a new instance of the class and specify the start and end points of the gradient, as well as the colors you want to use, like this:
Public Class Form1
    Dim g As Graphics = Me.CreateGraphics()
    Private Sub Button1_Click(sender As Object, e As EventArgs) Handles Button1.Click
        Dim brush As New LinearGradientBrush(New Point(0, 0), New Point(100, 100), Color.Red, Color.Yellow)
        g.FillRectangle(brush, 10, 10, 100, 50)
    End Sub
End Class
This code will fill a rectangle with a gradient color that starts at red and ends at yellow.
The output is given below.

Animating Graphics
Animating graphics in vb.net involves changing the appearance or position of graphical objects over time to create the illusion of motion. This can be done using a technique called double-buffering.
Double-buffering involves creating an off-screen bitmap (a temporary image) to draw the graphics onto, and then displaying the finished image on the screen all at once. This eliminates flickering that can occur when updating the screen multiple times per second.
Imports System.Drawing.Drawing2D

Public Class Form1
    Private ballX As Integer = 50
    Private ballY As Integer = 50
    Private ballSpeedX As Integer = 5
    Private ballSpeedY As Integer = 5
    Private ballSize As Integer = 50

    Private WithEvents tmrAnimation As New Timer()

    Private Sub Form1_Load(ByVal sender As System.Object, ByVal e As System.EventArgs) Handles MyBase.Load
        ' Enable double-buffering to improve animation
        Me.DoubleBuffered = True

        ' Set the timer interval to 20 milliseconds
        tmrAnimation.Interval = 20
        tmrAnimation.Enabled = True
    End Sub

    Private Sub Form1_Paint(ByVal sender As System.Object, ByVal e As System.Windows.Forms.PaintEventArgs) Handles MyBase.Paint
        ' Draw the ball at its current position
        Dim brush As New SolidBrush(Color.Blue)
        e.Graphics.FillEllipse(brush, ballX, ballY, ballSize, ballSize)
    End Sub

    Private Sub tmrAnimation_Tick(ByVal sender As System.Object, ByVal e As System.EventArgs) Handles tmrAnimation.Tick
        ' Update the position of the ball
        ballX += ballSpeedX
        ballY += ballSpeedY

        ' Check if the ball has hit the walls of the form
        If ballX < 0 OrElse ballX + ballSize > Me.ClientSize.Width Then
            ballSpeedX = -ballSpeedX
        End If

        If ballY < 0 OrElse ballY + ballSize > Me.ClientSize.Height Then
            ballSpeedY = -ballSpeedY
        End If

        ' Redraw the ball on the form
        Me.Refresh()
    End Sub
End Class
In this example, we have created a Form control and set its DoubleBuffered property to True to enable double-buffering. When the form loads, we create a timer object that will be used to update the graphics on the form at a regular interval. In the timer event handler, we update the position of the ball by changing its x and y coordinates. We also check if the ball has hit the walls of the form and change its direction accordingly.
To animate the ball, we use the Graphics object’s FillEllipse method to draw the ball at its current position. We then call the Refresh method of the form to update the display. By repeatedly updating the position of the ball and redrawing it on the form, we create the illusion of motion.
To make the animation smoother, we use double-buffering. Double-buffering involves creating an off-screen buffer to hold the image of the graphics we want to display. We draw the graphics on this buffer and then copy the buffer to the screen. This reduces flickering and improves the animation’s overall smoothness.
In this code, we create a ball object that moves across the form and bounces off the walls. We use a timer to update the ball’s position and refresh the display at a regular interval. The Form control’s Paint event is used to draw the ball on the form. Double-buffering is used to improve the animation’s smoothness.
Please run the app and check the output yourself. It is 100% okay on my enviroment.
Conclusion
Conclusion
The world of software development is enriched by the dynamic capabilities of Graphics in VB.NET, where the marriage of art and technology results in visually captivating applications. Throughout this exploration of graphics utilization, we’ve journeyed through its intricacies and significance, highlighting how it empowers developers to craft immersive and visually appealing user experiences.
Graphics in VB.NET serves as a canvas for imagination, enabling the creation of graphical elements, animations, and visual representations that enhance user engagement. From the inception of shapes and lines to the orchestration of complex animations, this domain empowers developers to breathe life into their applications, transforming them into interactive works of art.
The integration of advanced techniques within Graphics in VB.NET propels application design towards enhanced interactivity, aesthetics, and innovation. Developers can harness vector graphics, utilize transformations, and implement custom rendering, elevating user experiences to new heights. Moreover, the integration of graphical components fosters seamless communication of data and concepts to users, enhancing comprehension and usability.
Collaboration remains at the heart of development, and Graphics in VB.NET fosters an environment where developers, designers, and stakeholders collaborate to manifest their creative visions. By aligning visual elements with application goals and user expectations, organizations can create software solutions that resonate with their target audience.
In summation, Graphics in VB.NET is not just about lines and colors; it’s a powerful tool that empowers developers to transcend the boundaries of functionality and create experiences that captivate and engage users.
Q: 1. What is Graphics in VB.NET?
A: Graphics in VB.NET refers to the utilization of graphical elements, animations, and visual representations within the Visual Basic.NET programming language.
Q: 2. Why is Graphics in VB.NET important?
A: Graphics in VB.NET adds visual appeal and interactivity to applications, enhancing user experiences and communication.
Q: 3. What skills are essential for successful Graphics in VB.NET?
A: Proficiency in Visual Basic.NET, understanding of graphics libraries, and design sensibilities are crucial for effective graphics development.
Q: 4. How does Graphics in VB.NET benefit application design?
A: Graphics in VB.NET allows developers to create visually captivating elements, animations, and representations that engage users.
Q: 5. Can advanced graphics techniques be applied in VB.NET?
A: Yes, advanced techniques include vector graphics, transformations, and custom rendering to create intricate visual experiences.
Q: 6. What role does collaboration play in Graphics in VB.NET?
A: Collaboration among developers, designers, and stakeholders ensures that graphical elements align with application goals and user expectations.
Q: 7. Is Graphics in VB.NET limited to aesthetics?
A: No, graphics elements can also serve as effective tools for conveying data, concepts, and user interactions.
Q: 8. Can Graphics in VB.NET enhance user engagement?
A: Yes, visually appealing graphics and interactive animations can significantly enhance user engagement and overall application experience.
Q: 9. How does Graphics in VB.NET align with modern application development?
A: Graphics in VB.NET contributes to creating modern, user-centric applications that prioritize both functionality and aesthetics.
Q: 10. Is Graphics in VB.NET a specialized skill?
A: While proficiency in graphics design can enhance the quality of graphical elements, developers with a grasp of VB.NET can also create effective graphics within their applications.
More Links
Â
